How to Redline in Word: The Complete Guide

Huzaifa Sultana is a Marketing Associate at SpotDraft focusing on Organic Growth through SEO and AEO.

Contract negotiation involves multiple rounds of back and forth and 90 percent of lawyers use Microsoft Word to manage those edits.
Here's what redlining actually means, exactly how to do it in Word, and where the process tends to break down once a document has been through more than a couple of negotiation rounds.
A redline is a document showing tracked, visible changes, typically colored in red, that are open for the other party's review and approval. It's the standard way legal teams negotiate contract language transparently instead of silently rewriting sections and hoping nobody notices.
In Word specifically, added text appears with a red underline and deleted text appears with a red strikethrough. Each change exists only as a suggestion until the document owner accepts or rejects it and Word records who made each edit and when. That attribution is the whole point: a redlined document tells you not just what changed, but who proposed it, which matters the moment a negotiation gets contentious.
The term itself comes from the physical practice of marking up paper drafts with a red pen, long before word processors existed. The visual convention stuck even after the process went digital, which is why "redline" and "tracked changes" are used almost interchangeably in legal and business writing today, even though Word's actual feature is called Track Changes.
To redline a document means to mark it up with visible, trackable edits rather than editing it silently. Every insertion, deletion and formatting change gets flagged so the other party (or another reviewer on your own team) can see exactly what changed, evaluate it and decide whether to accept it.
This matters most in contract negotiation, but it isn't limited to contracts. Redlining shows up anywhere; multiple people need to weigh in on the exact wording of a document: policy drafts, statements of work or even internal memos where precision matters.
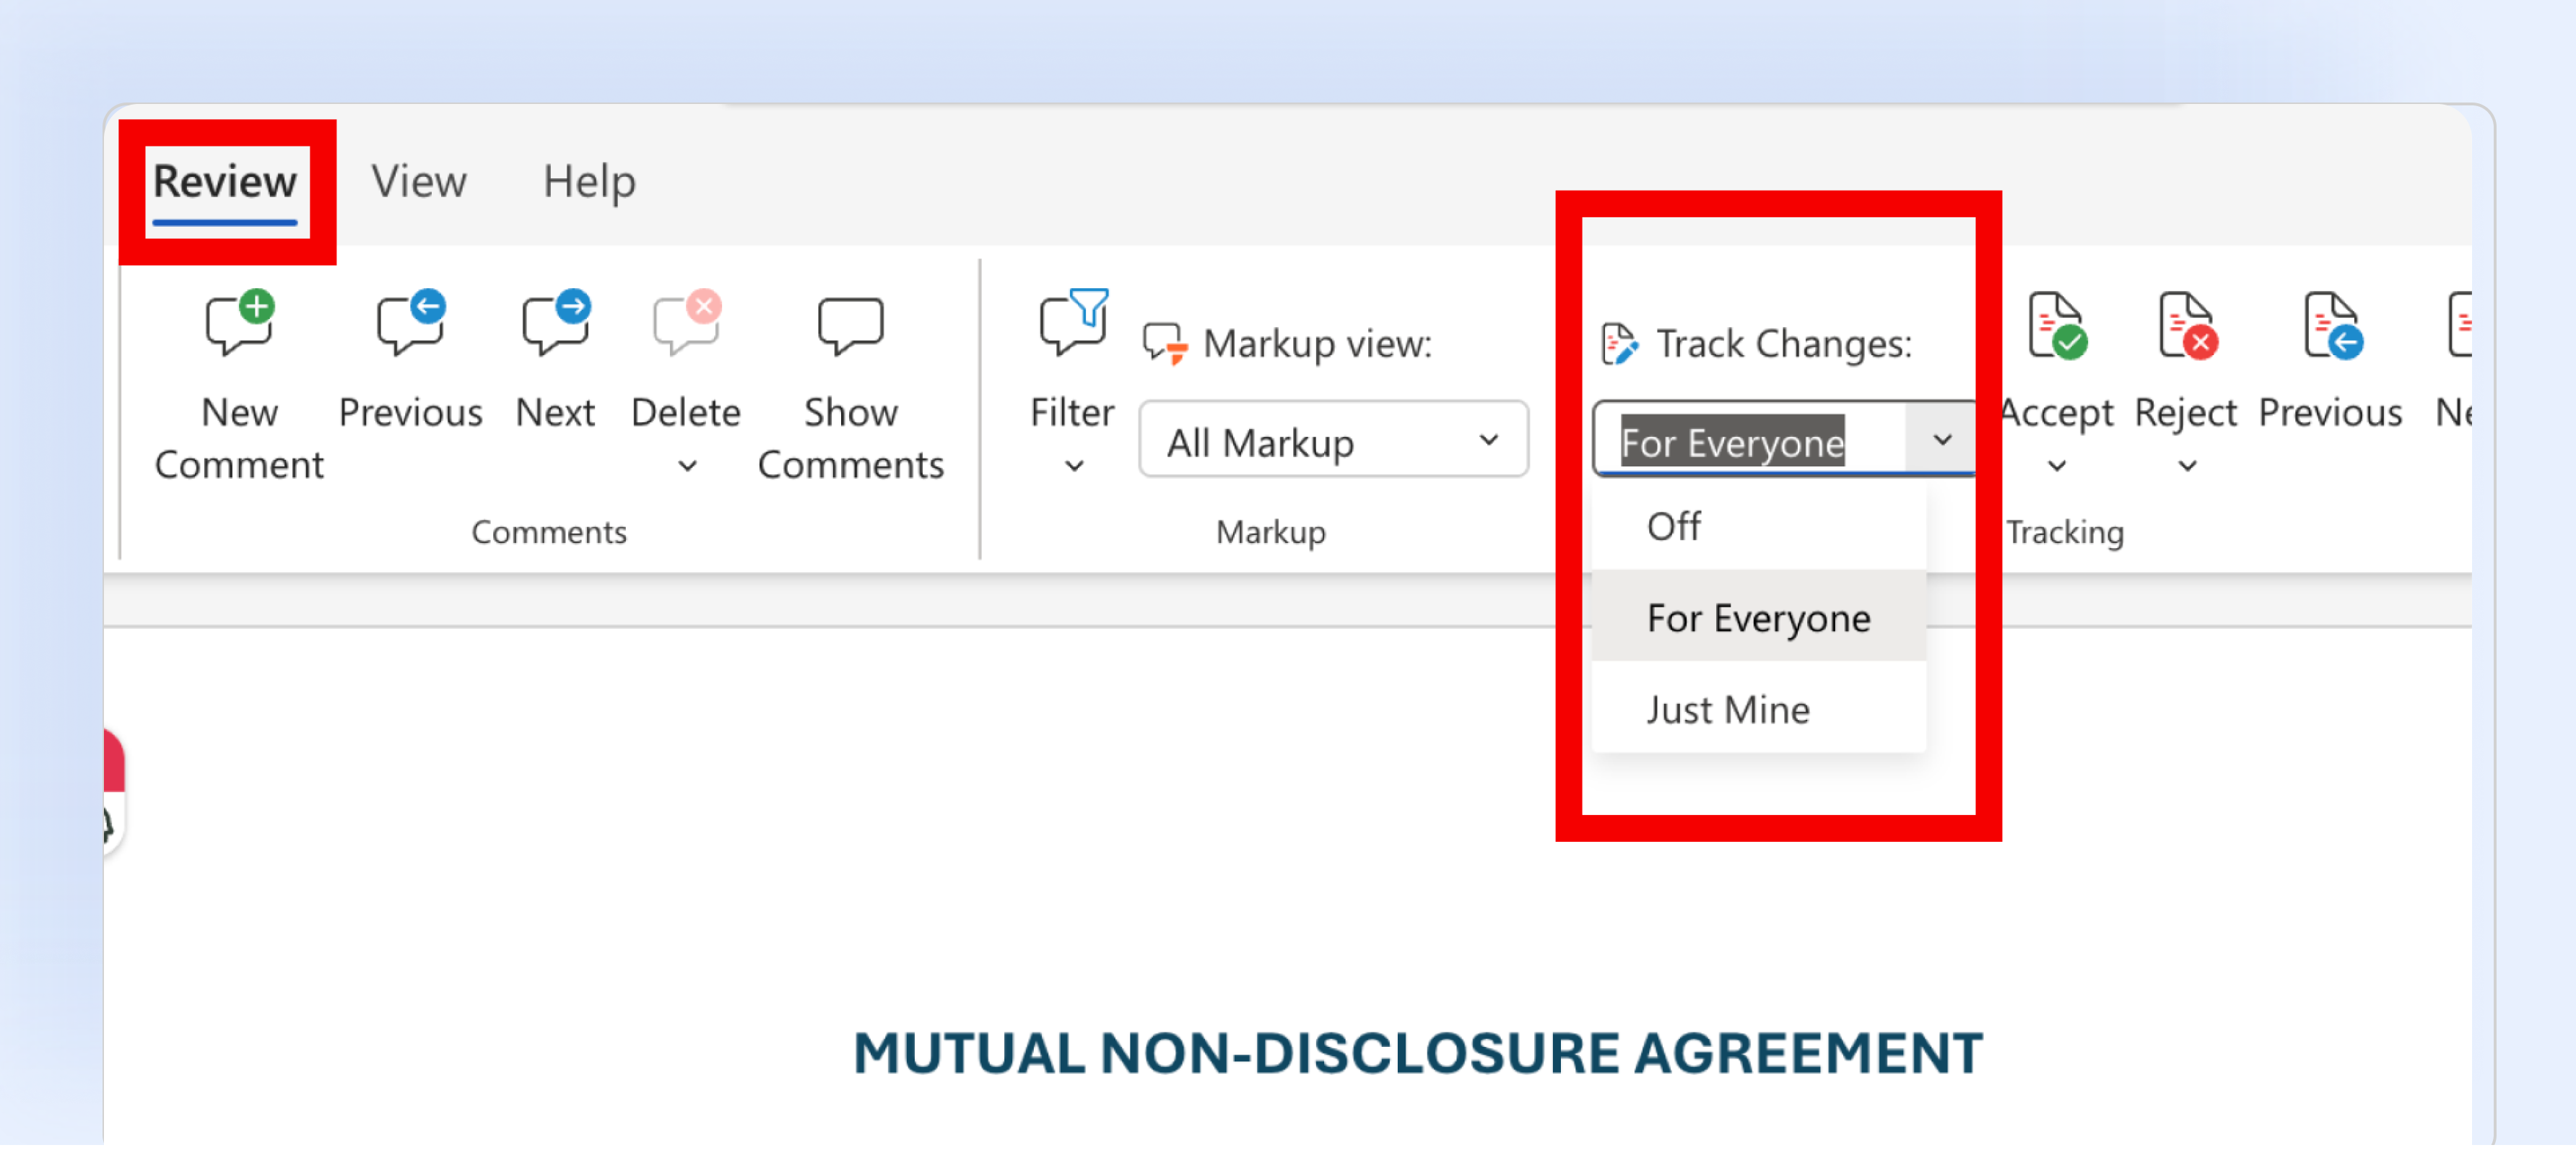
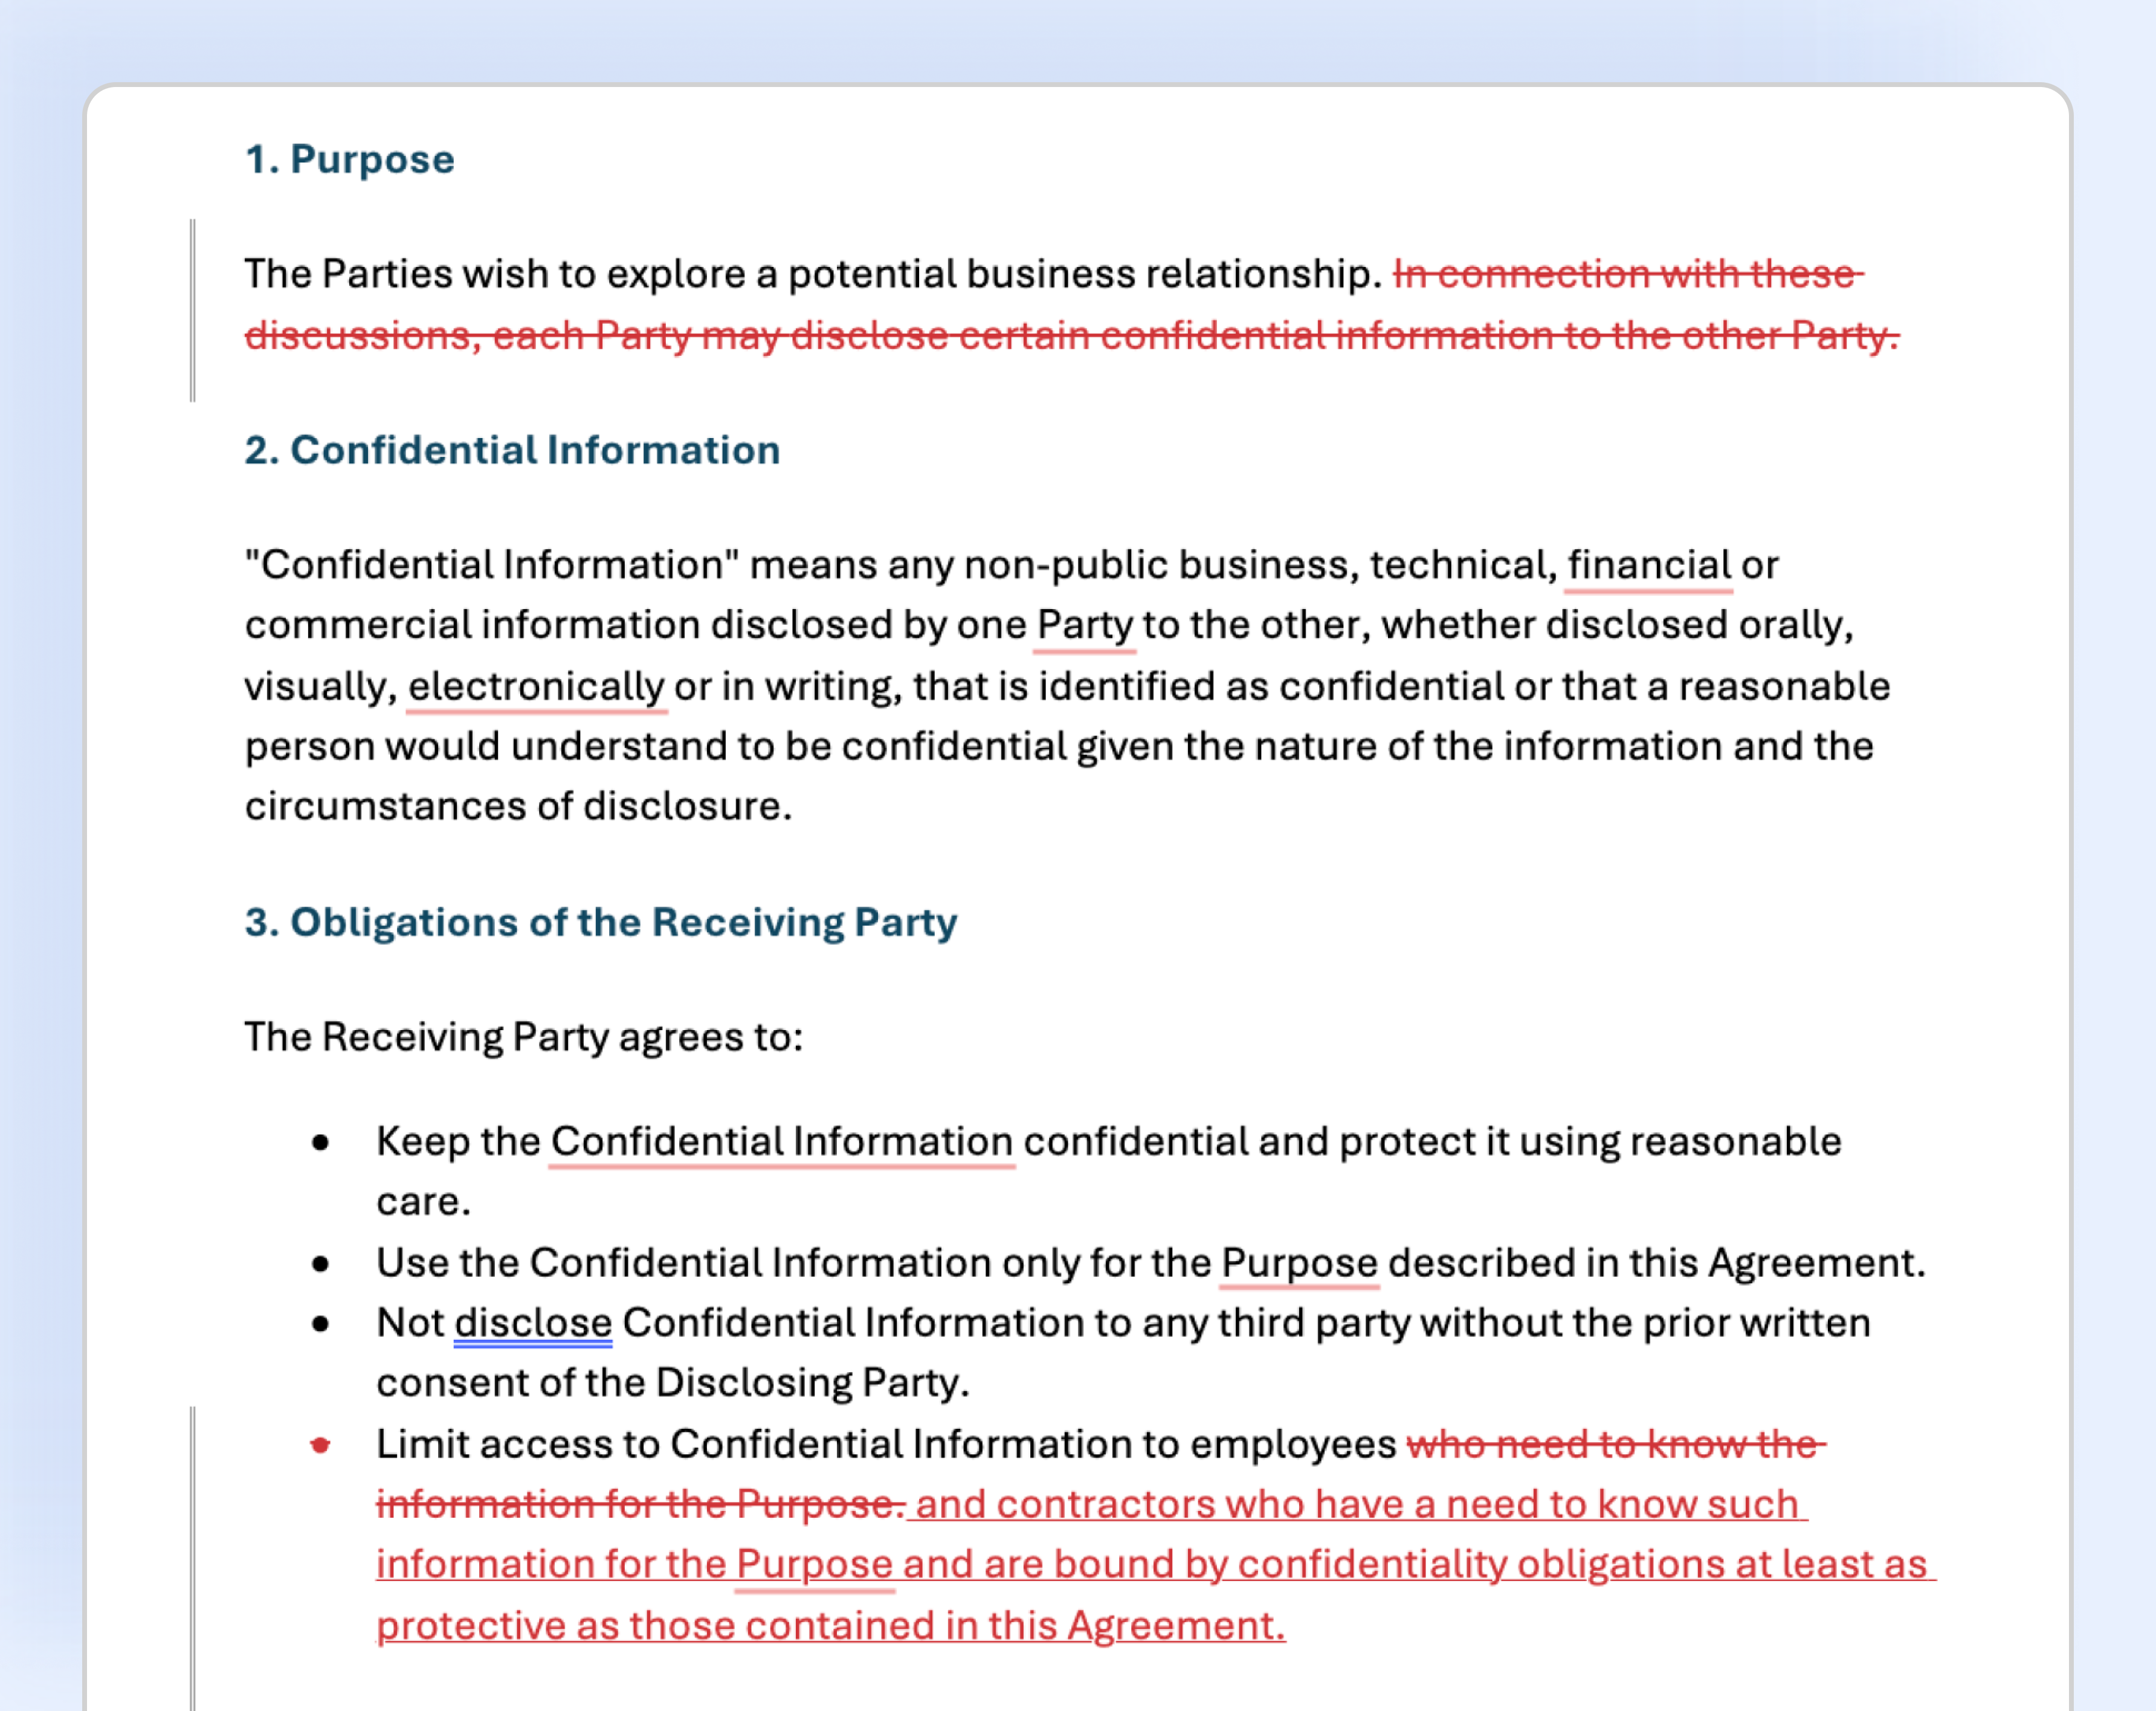
From this point, any addition, deletion or formatting change will show up in red (or whatever color Word has assigned to you), ready for review. Insertions appear underlined, deletions appear with a strikethrough and changes like bolding or italicizing get flagged too.
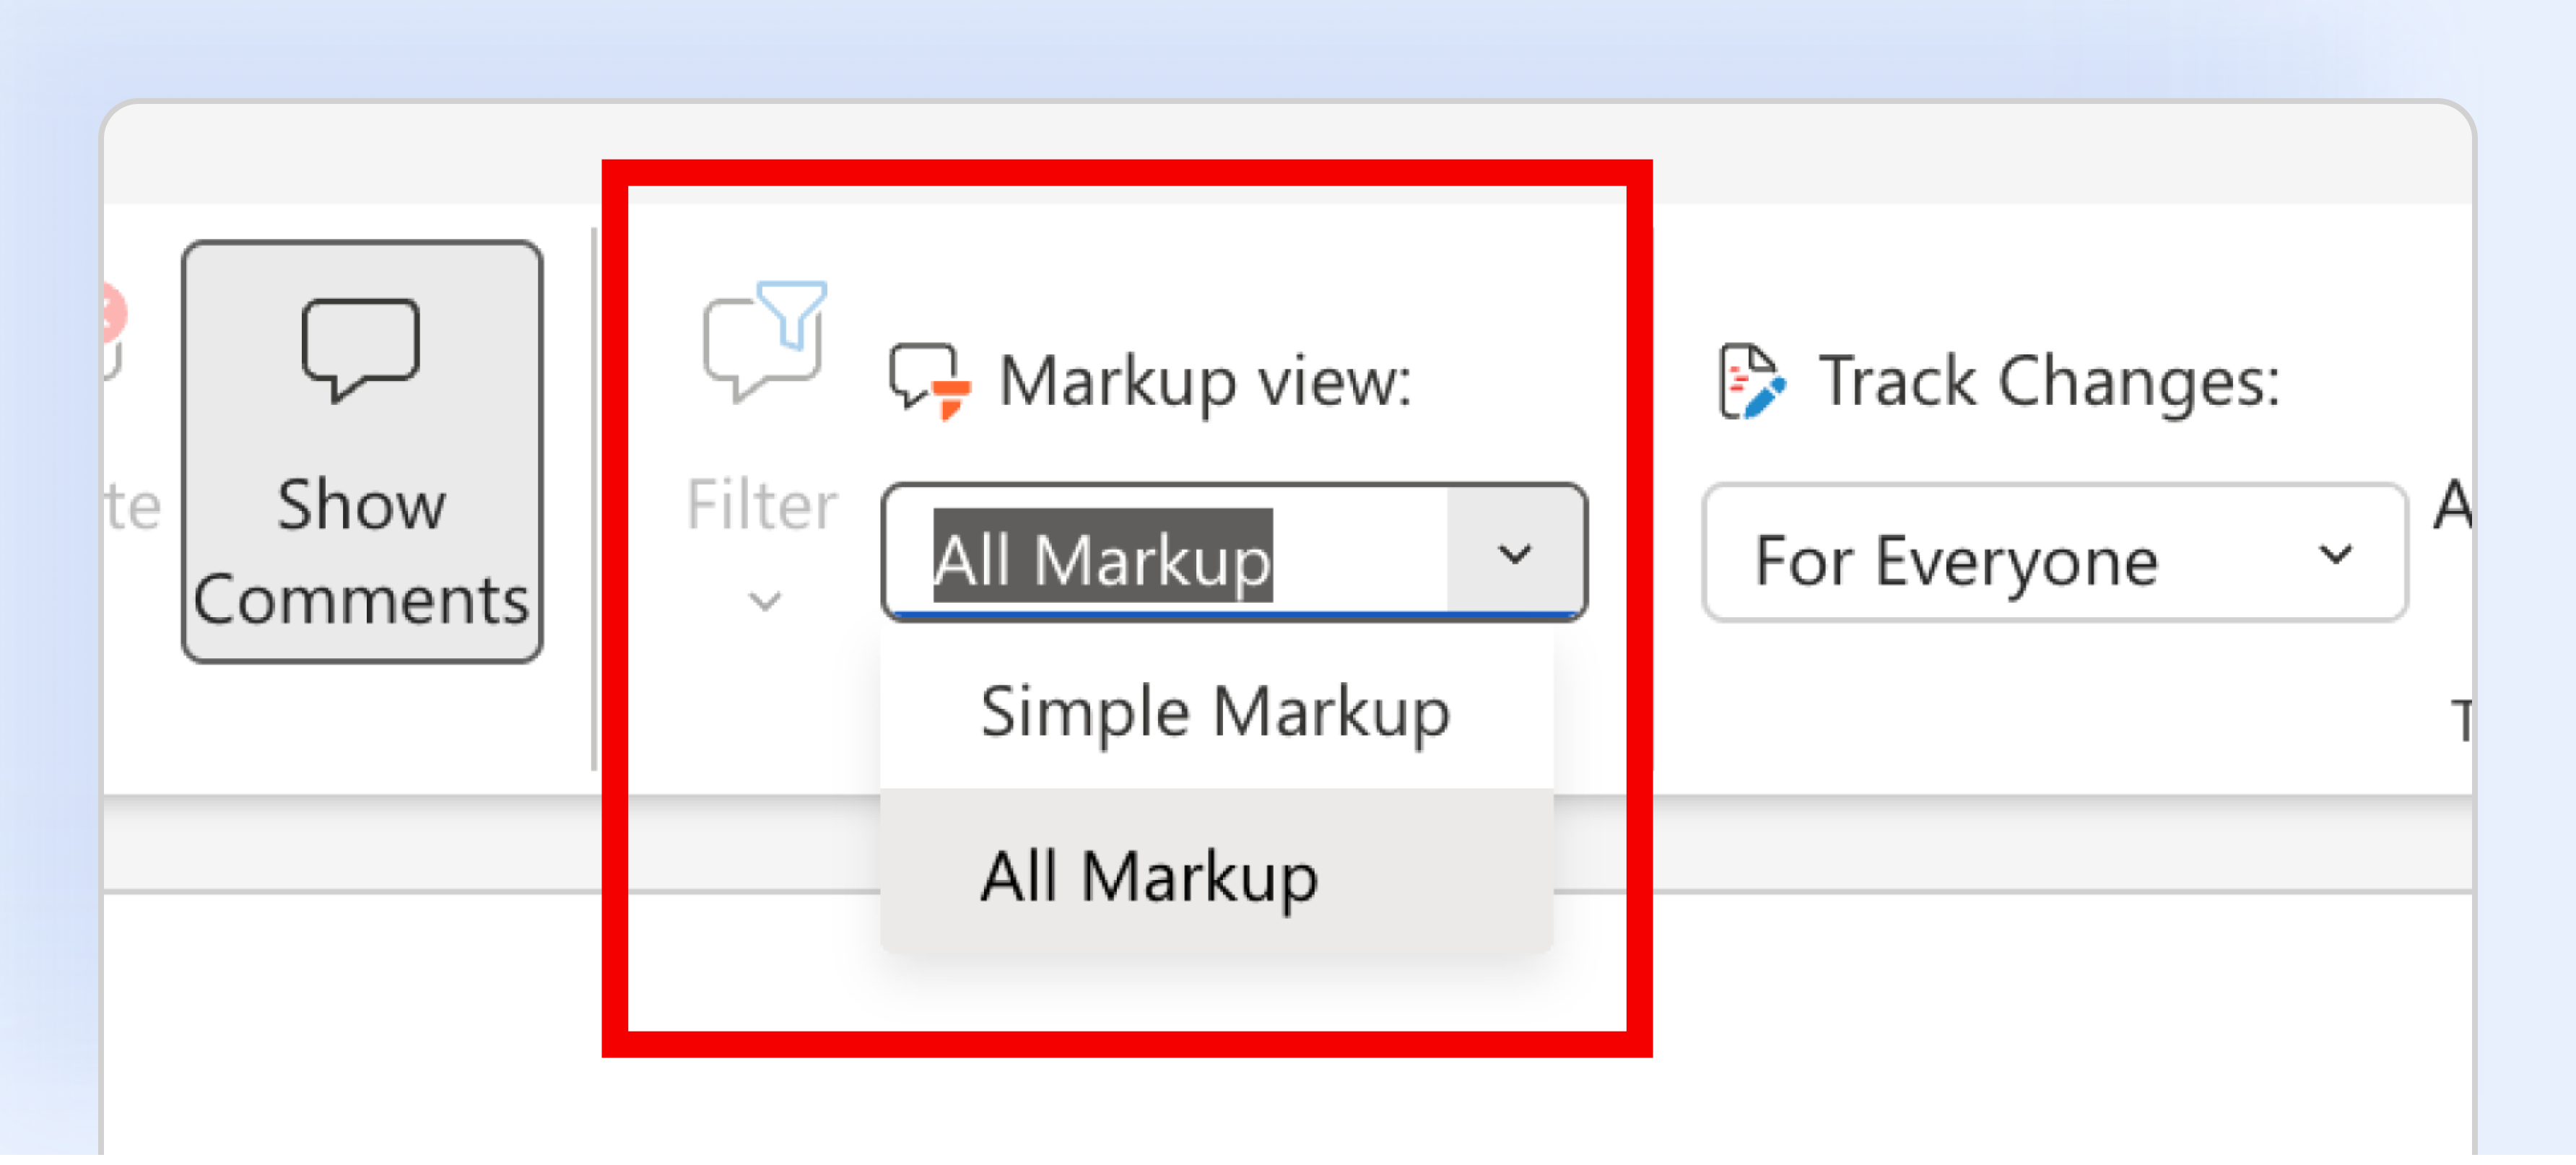
Word gives you four different views for looking at a redlined document:
Switching between these is useful at different negotiation stages: Simple Markup for a quick read and all markup when you're actually deciding what to accept.
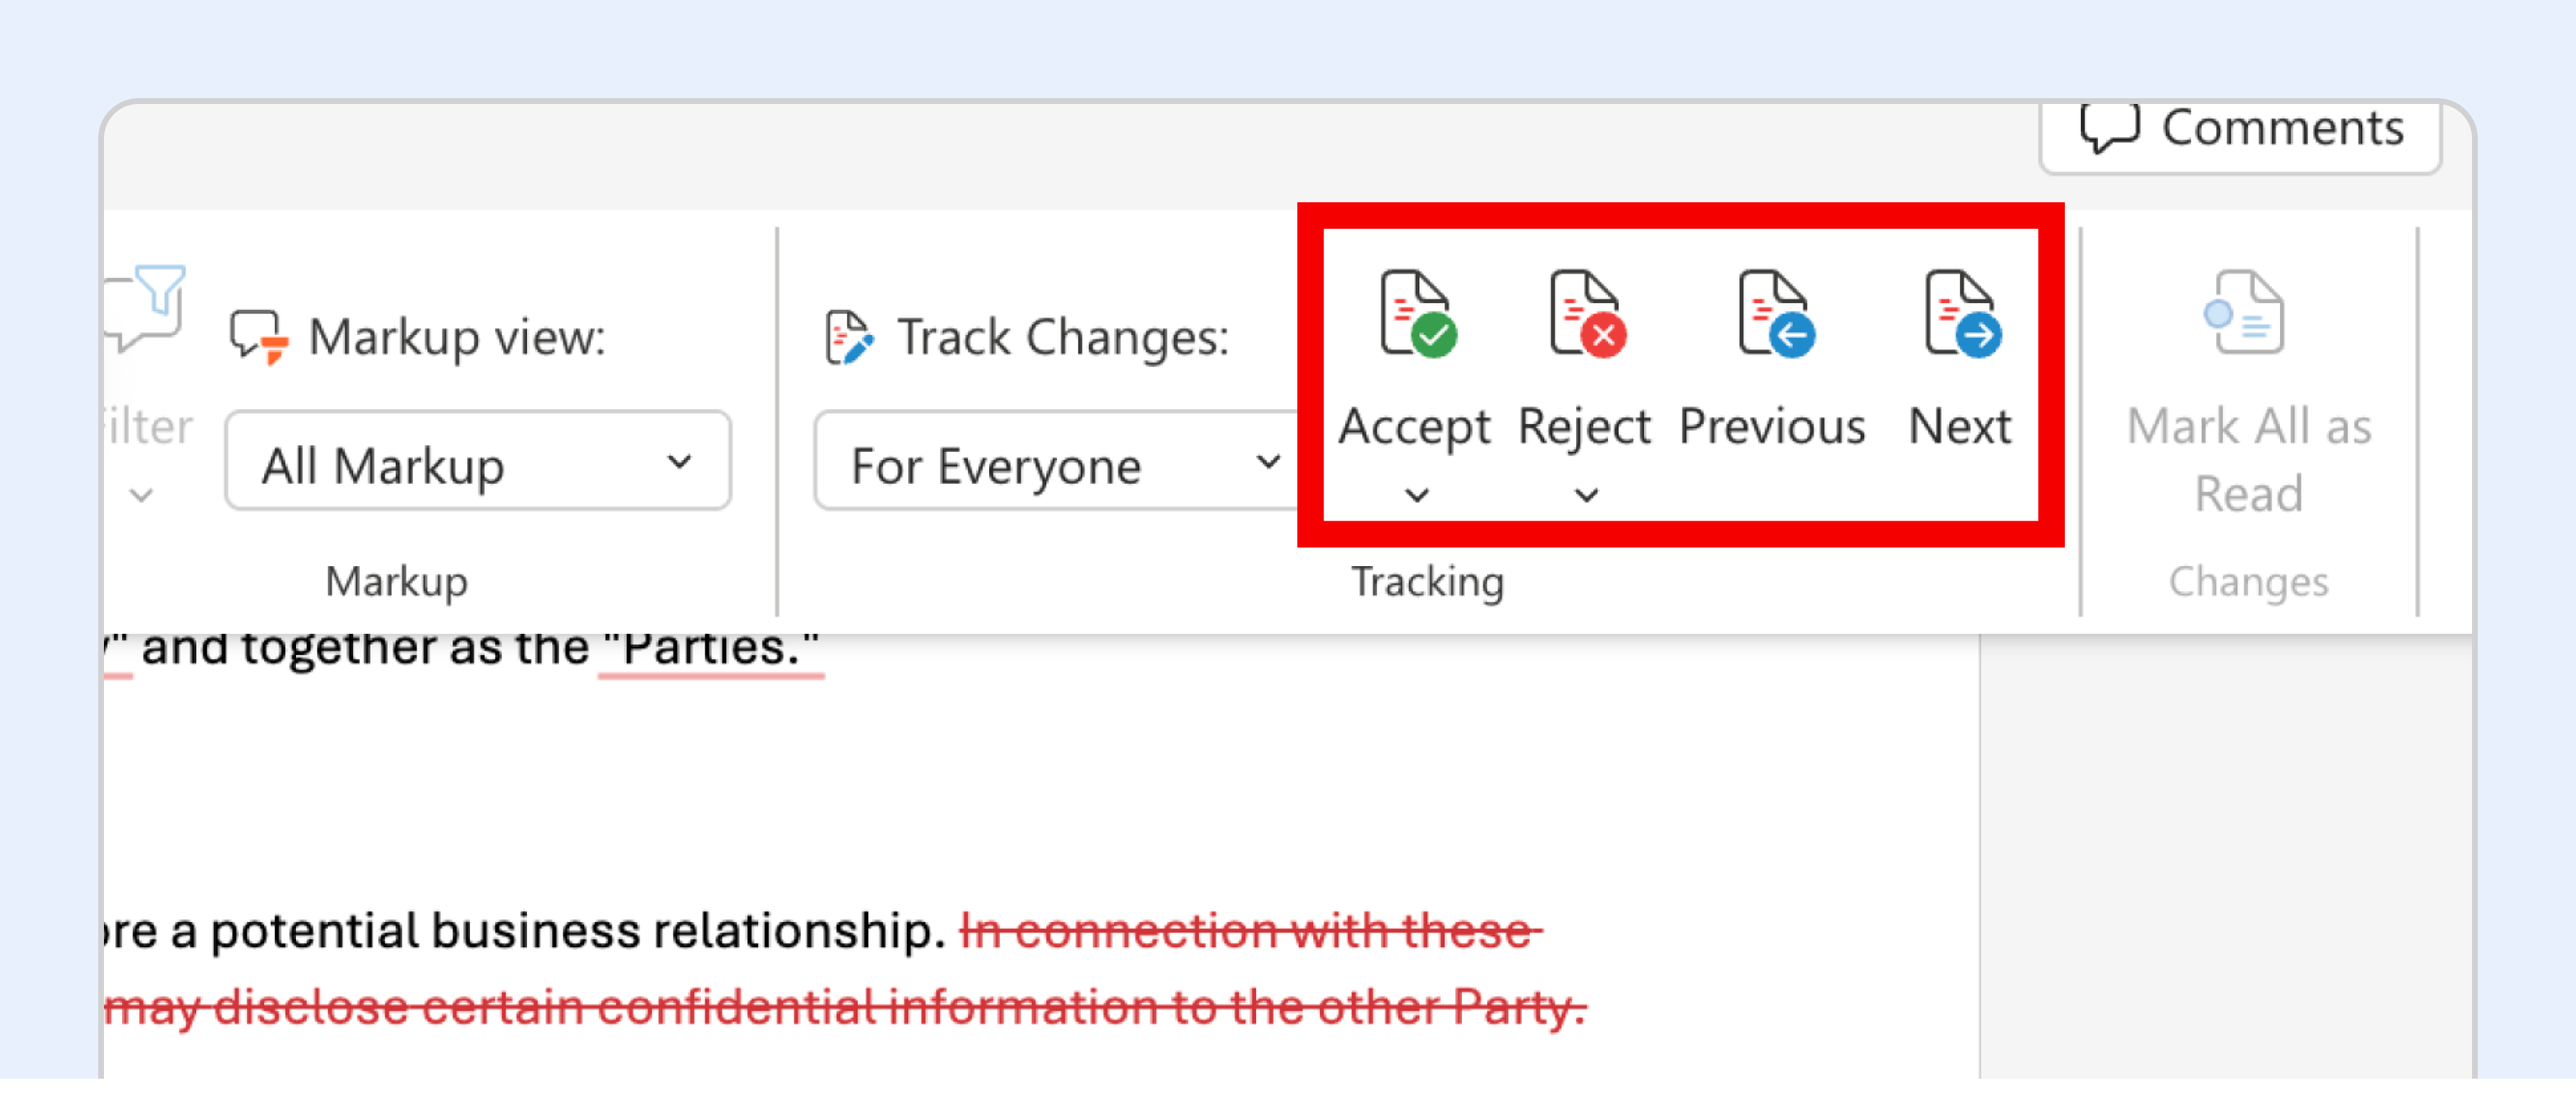
You can also click directly on a specific change in the text and choose Accept or Reject from the popup menu that appears, without navigating through every change in order. To move faster on a document with many small edits, click the dropdown arrow next to Accept or Reject and choose "Accept All Changes" or "Reject All Changes" to clear the whole document in one step.
Also Read: Redlining in Google Docs
There's a real difference between turning Track Changes off and actually removing existing redlines, and mixing the two up is a common mistake.
To stop new changes from being tracked: Go to the Review tab and click Track Changes to toggle it off (or use the Ctrl+Shift+E / Cmd+Shift+E shortcut again). This only affects edits made from this point forward. Anything already tracked in the document stays visible.
To actually remove the red lines already in a document: You need to accept or reject the existing tracked changes, there's no separate "delete the redlines" button. Use Accept All Changes if you want the edits to stick, or Reject All Changes if you want to revert to the original text. Only after that will the document display cleanly with no markup.
One thing worth knowing: even after changes are accepted, Word can retain metadata about the editing history unless you specifically clean the document (see the security section below), so a document that looks "clean" on screen isn't always fully clean under the hood.
Word's default red-and-underlined style isn't the only option, and for teams juggling input from multiple reviewers, customizing it is genuinely useful.
Word also automatically assigns a different color to each reviewer by default, which makes it much easier to tell at a glance who proposed which change on a document that's been through several reviewers.
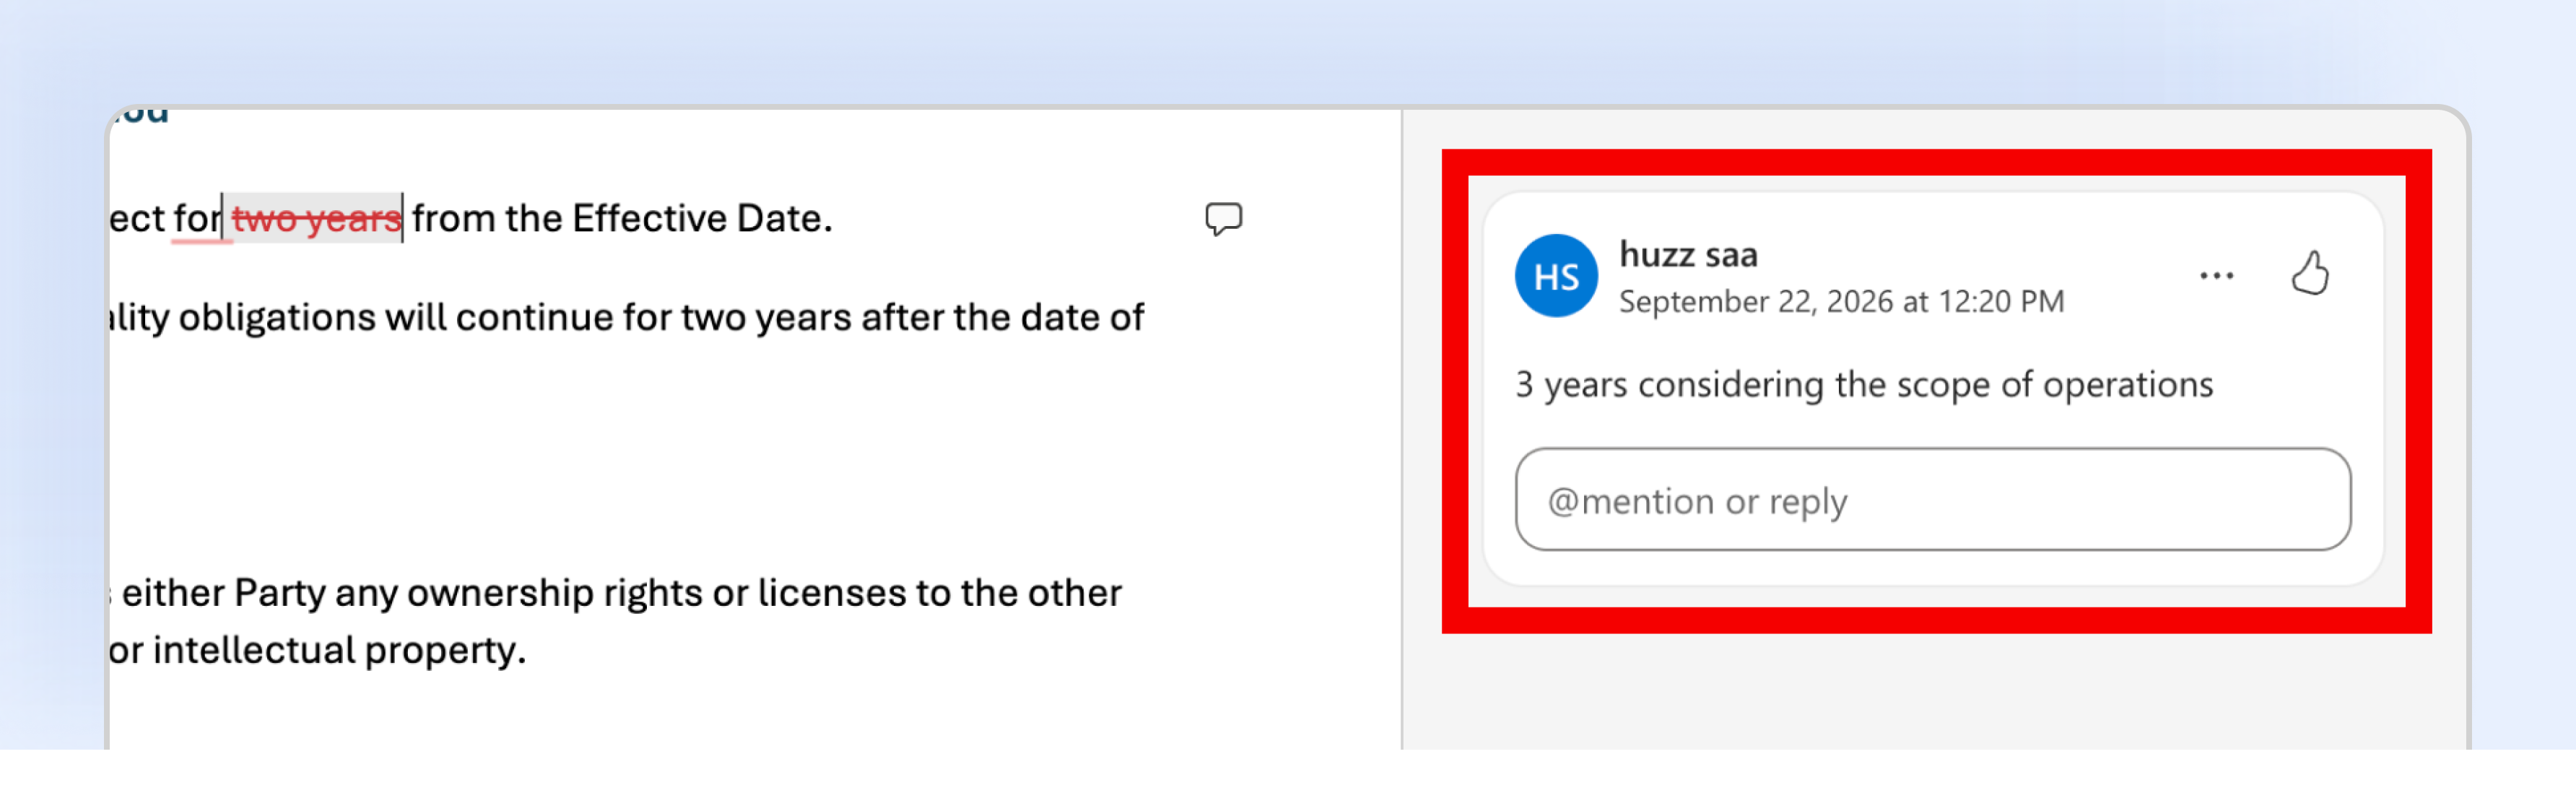
A redline shows what changed. A comment explains why. Highlight the relevant text and select "New Comment" from the Review tab to attach a note explaining your reasoning, flagging an open question, or asking the other side to confirm something before you accept their language.
In contract negotiation specifically, comments often carry as much weight as the redline itself, since "we changed the liability cap" means something very different depending on whether the comment attached to it says "per our standard playbook" or "open to discussion, let's talk."
If you're circulating a document across multiple stakeholders, two features are worth knowing about beyond the basics.
Locking Track Changes prevents anyone from quietly turning the feature off mid-edit, which would let changes slip through untracked. Under the Track Changes dropdown, select "Lock Tracking" and set a password. Anyone editing the document has Track Changes forced on until someone unlocks it.
The Reviewing Pane gives you a running list of every tracked change in the document, insertions, deletions, comments, and formatting edits, in one scrollable panel rather than scattered through the text. For a document with dozens of edits across several rounds, this is often faster to scan than paging through the document itself.
Sometimes you receive a document back from a counterparty with no tracked changes at all, just a new version with silent edits baked in. Word's Compare feature (under Review > Compare) lets you select two versions of a document and generates a new file showing the differences as tracked changes, effectively creating a redline after the fact.
This is a useful fallback, but it depends entirely on the two files actually representing the same document lineage. If formatting drifted between versions, the comparison can flag noise (reformatted paragraphs, for instance) alongside genuine substantive changes, which is exactly the kind of signal-to-noise problem that gets worse as negotiation rounds pile up.
Also Read: Ensuring Contract Version Control
How to solve it: Turn on Track Changes before making any edits so every change is visible to the other party.
How to solve it: Confirm you're using the latest version before making changes. Use Word's Compare feature if you're unsure.
How to solve it: Review important changes individually before accepting them, especially changes to liability, indemnity, termination or payment terms.
How to solve it: Remove or resolve internal comments before sending the document to the counterparty. Keep a separate internal copy if needed.
How to solve it: Use a consistent naming system and keep a clear record of each negotiation round so everyone knows which version is current.
1. No app switching.
Lawyers already spend hours working in Word, so redlining in the same environment avoids adding another tool to the workflow. Teams can review clauses, make edits and leave comments without moving between applications.
2. Familiar and easy to use.
Most legal professionals already know how Track Changes, comments, Accept and Reject work. That familiarity makes Word relatively easy to introduce across a legal team without much training.
3. Easy to share with counterparties.
Word is widely used for contract negotiations, so teams can send a redlined document to the other party without requiring them to create an account or learn a new platform.
4. Clear visibility into changes.
Track Changes makes additions and deletions visible, while comments let reviewers explain why they are proposing a change. This makes it easier to review what has changed between versions.
5. Useful for straightforward negotiations.
For a short NDA, vendor agreement or other contract with only a few reviewers and relatively simple changes, Word can provide everything needed to create and review redlines.
1. Version control gets messy.
Multiple rounds of edits can quickly create a pile of Word files with slightly different changes. Names like V2, V3, Final and Final_v2 don't solve the underlying problem of knowing which version is actually current.
2. Limited collaboration and access controls.
Word supports comments, co-authoring and some editing restrictions, but it isn't designed around contract-specific negotiation workflows. Managing multiple reviewers, permissions and responsibilities can become difficult as negotiations get more complex.
3. Track Changes can become difficult to manage.
A heavily redlined contract can contain hundreds of edits and comments. Reviewers have to work through them manually, and turning tracking off or accepting changes can make it harder to reconstruct how the agreement evolved.
4. Important changes can get buried.
Word treats every edit as part of the document. A minor wording change can appear alongside a major change to liability, indemnification or termination terms. Reviewers have to identify which changes actually carry business or legal significance.
5. The negotiation happens across too many places.
The document may live in Word while approvals happen over email or chat and the latest version sits in someone's inbox. Word can help edit the contract, but it doesn't provide a centralized workflow for managing the negotiation from review through approval and execution.
Word is not the problem. The problem is using a document editor to manage an entire negotiation. For a simple contract with a few changes, Track Changes can work perfectly well. The challenges start when negotiations involve multiple reviewers, repeated versions, approval requirements and dozens of material changes. At that point, teams need more than a way to mark up text. They need a way to control the negotiation around the document.
The key difference
Word is primarily a document editor. A CLM is designed to manage the contract process around the document.
Word can handle the mechanics of redlining well, especially for straightforward negotiations. A CLM becomes more useful when negotiations involve multiple stakeholders, repeated revisions, approval workflows, contract policies and a need for centralized visibility.
Also Read: Redlining in PDFs
.webp)
Modern contract lifecycle management platforms are built specifically for this. A CLM software brings the contract, its versions, comments, approvals and negotiation workflow into one place. Instead of sending Word files back and forth and managing approvals separately, teams can work from a centralized contract record.
SpotDraft takes this a step further with a contract editor designed for negotiation. Teams can make and review redlines, collaborate with stakeholders and manage contract versions without losing track of the negotiation history.
SpotDraft also lets teams set section-level editing permissions and stakeholder-specific comments, so the right people can review the right parts of a contract. Its automated redlining capabilities can identify changes across versions, while built-in checks can flag issues such as duplicate definitions and undefined terms.
For teams that still prefer working in Microsoft Word, SpotDraft's Word integration lets them work with contracts in a familiar environment while keeping the broader contract workflow connected.
This means teams don't have to choose between the familiarity of Word and the structure of a CLM. They can use Word where it makes sense while bringing version control, collaboration, approvals and contract intelligence into the same workflow.
Request a demo to see it for yourself.